Unifi UNAS Pro 8 to Proxmox & Plex: Persistent NFS for Your Media
Unlock robust and reliable media storage! This post guides you through setting up a permanent NFS connection from your Unifi UNAS Pro 8 to a Proxmox server, then seamlessly bind mounting that storage into your Plex LXC container for optimal performance and accessibility.
If you’re running Plex inside a Proxmox LXC container and your media lives on a Unifi UNAS Pro 8, getting that storage reliably mounted, and keeping it mounted across reboots, takes a few steps. This guide walks through the whole chain: enabling NFS on the UNAS, mounting it on the Proxmox host, making it persistent with fstab, and bind mounting it into the Plex LXC container.
Prerequisites
- Unifi UNAS Pro 8 set up and accessible on your local network
- Proxmox host running and reachable
- A Plex LXC container already created
- Basic familiarity with the Proxmox shell
(Optional) Step 0: Setup a Separate User
I setup a separate user specifically for Plex. You can setup the NFS connection with your user, but I wanted to keep the access separate.
- Log into your UniFi OS console and navigate to the Drive application.
- Click the Admins & Users in the left-hand navigation bar. NOTE: Sometimes the linke doesn’t navigate to the correct page; the URL should look like:
https://unifi.ui.com/consoles/<YOUR_CONSOLE_ID>/drive/admins/users - At the top, click Create New.
- Fill in the user details.
- If you already have the Shared Drive created, click the Shared Drives link and select the drives that Plex will need access to.
Step 1: Enable NFS on the UNAS Pro 8
- Log into your UniFi OS console and navigate to the Drive application.
- Click All Files in the left-hand navigation bar.
- Create the Shared Drive you want to use, if you haven’t already.
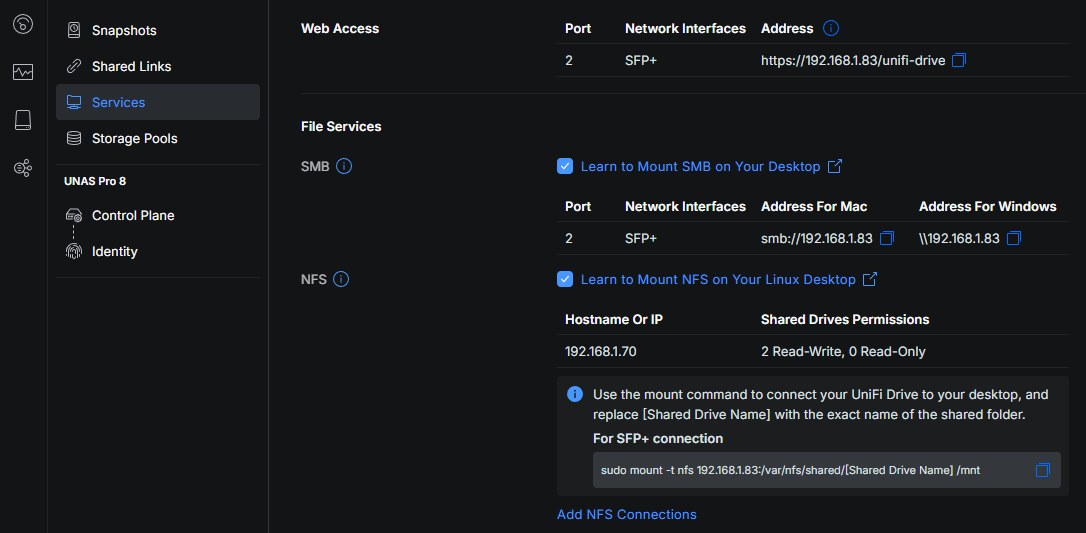
- Navigate to Settings → Services, look for the File Services section, then look for NFS.
- Enable the NFS service by checking the box next to NFS.
Add a new NFS share, by clicking ADD NFS Connections.
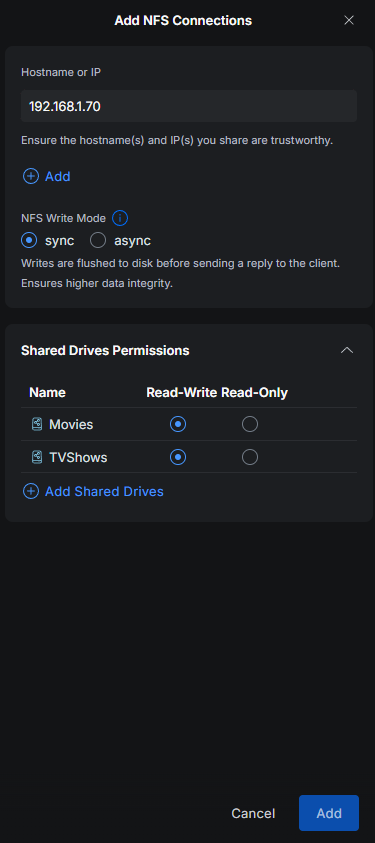 Add NFS Connections
- Set the Hostname or IP to your Proxmox host’s IP address (ex.,
192.168.1.70). - Set the NFS Write Mode; I selected sync.
- Click the Add Shared Drives link.
- Select the Shared Drive(s) you want to use, and make sure to select the permission you want at the bottom, Read-Write or Read-Only.
- Click Apply.
 Completed setup enabling NFS service and connections for Unifi Drive
Take note of the UNAS Pro’s IP address (ex. 192.168.1.83) and the NFS export path, which looks like /var/nfs/shared/[Shared Drive Name].
Step 2: Prepare the Proxmox Host
My Proxmox setup is fairly simple with a single node, so you might need to do this on every node if you have more nodes.
- Open a browser and navigate to your Proxmox UI.
Select your node, and click Shell in the menu.
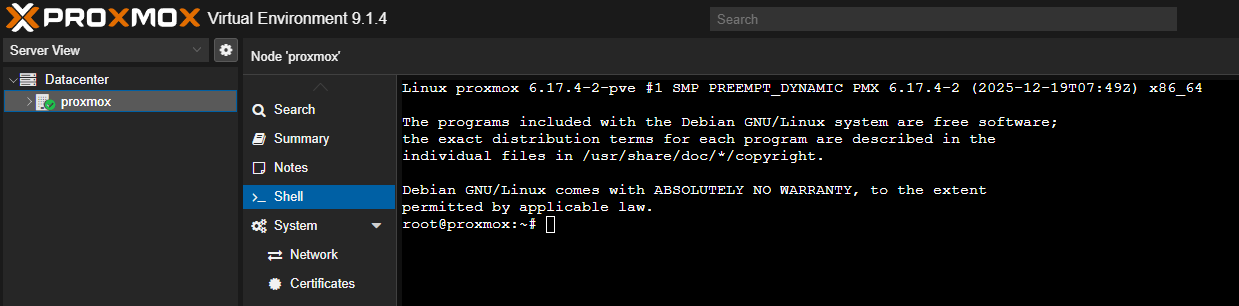 Proxmox Node Shell
Create a local mount point on the Proxmox host.
1
 mkdir -p /mnt/unas-pro-8-tvshows
Test that the NFS share is reachable and mounts correctly before committing it to
fstab:1
mount -t nfs 192.168.1.83:/var/nfs/shared/TVShows /mnt/unas-pro-8-tvshowsVerify you can see your files:
1
 ls /mnt/unas-pro-8-tvshows
If everything looks good, unmount the share. We will add the permanent mount to
fstab. NOTE: the command umount, not unmount.1
umount /mnt/unas-pro-8-tvshows
Step 3: Make the NFS Mount Persistent with fstab
In the same Shell session for the Proxmox host, open
/etc/fstab.1
nano /etc/fstab
Add the following line at the bottom, replacing the IP (of the NAS) and paths with yours. On a Windows machine, I can paste into the Shell using
Ctrl+Shift+v. After the mount is infstab, you will need to save and exit nano. To do that, you will pressCtrl+xto start to exit,yto save the changes, andEnterto finish.1
mount 192.168.1.83:/var/nfs/shared/TVShows /mnt/unas-pro-8-tvshows nfs defaults 0 0
Reload the systemd daemon and re-mount everything in
fstab.1 2
systemctl daemon-reload mount -aConfirm the mount is active. You should see a line of text return in the shell when you run the following command.
1
 df -h | grep unas-pro-8-tvshows
Step 4: Bind Mount the NFS Share into the Plex LXC Container
Now that the Proxmox host has the NFS share reliably mounted, you need to expose it to the Plex container as a bind mount.
Look in your left-hand navigation bar for Proxmox to find your Plex container’s ID (ex.
101). It’ll be the number in the name of the LXC.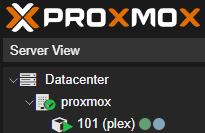 Proxmox Application List
- Select your Plex container, and click Shell in the menu.
Edit the Plex LXC’s config file.
1
 nano /etc/pve/lxc/101.conf
Add a
mp(mount point) line at the bottom of the config. NOTE: This will be my second mount, so it ismp1, but if this is your first, it will bemp0. Also, thempdoesn’t need to match themp#if you want it to be mounted somewhere else in the container. You can change the container-side path to whatever makes sense for your Plex library setup.1
mp1: /mnt/unas-pro-8-tvshows,mp=/mnt/unas-pro-8-tvshows
- Restart the Plex container to apply the change. I usually do this in from the UI.
Step 5: Add the Library in Plex
- Navigate and log into your Plex web UI.
- Click + next to your library name (mine says Plex). NOTE: Two things, one, if you don’t see a plus sign, you might need to click
MORE >to navigate to where you can add a library. Two, the plus button is hidden until you are hovering over the library name. - Choose the library type (Movies, TV Shows, etc.) and click Next.
- Click Browse For Media Folder and select
unas-pro-8-tvshows(or whichever path you set asmp=in the container config), then click Add Library. - Plex will scan and start building your library.
Wrapping Up
With this setup, your UNAS Pro 8’s NFS share will survive reboots on both the Proxmox host and the Plex container.
If more containers need access to the same share (ex. Immich), you just add another mp line to each container’s config pointing at the same /mnt/unas-pro-8-tvshows host path. No need to create additional NFS mounts.